Hey there! Sending your stems for mixing is an exciting step in the process, and we want to make sure you get the best possible results. To help things go smoothly, we’ve put together a simple guide on how to prepare and send your stems for mixing with Ableton. By following these steps, you’ll ensure that we have everything we need to create the perfect mix for you.
Name Your Stems Clearly ✏️
The more organized your stems are, the smoother the process will go. Make sure you label each stem clearly so we know exactly what we’re working with. Here’s what you need to do :
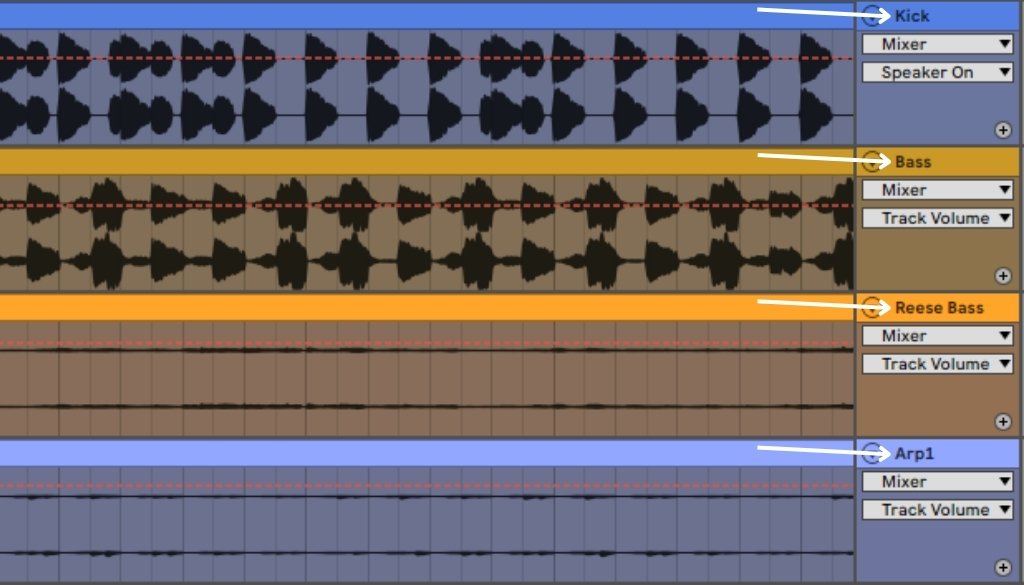
👉 Clear names are key : Name each stem after the instrument or sound (e.g., “Vocals,” “Snare Drum,” “Synth1”).
👉 Keep it simple : Avoid vague names like “Track 1” or “Audio 3.” It’ll just confuse us.
👉 Group similar tracks : If you have multiple parts of the same instrument, put them together. For example, all the drum stems (kick, snare, toms) can go in one folder.
This will save time and help us get straight to work !
Maintain All Processing ✅
When exporting stems for mixing, it’s essential to preserve all the key elements of your mix while avoiding unnecessary processing that could interfere with the mastering stage.
👉 Keep All Processing Intact : Ensure that all active effects, such as automation, EQ adjustments, and filters, remain applied to each stem. This keeps the intended dynamics and tonal balance intact.
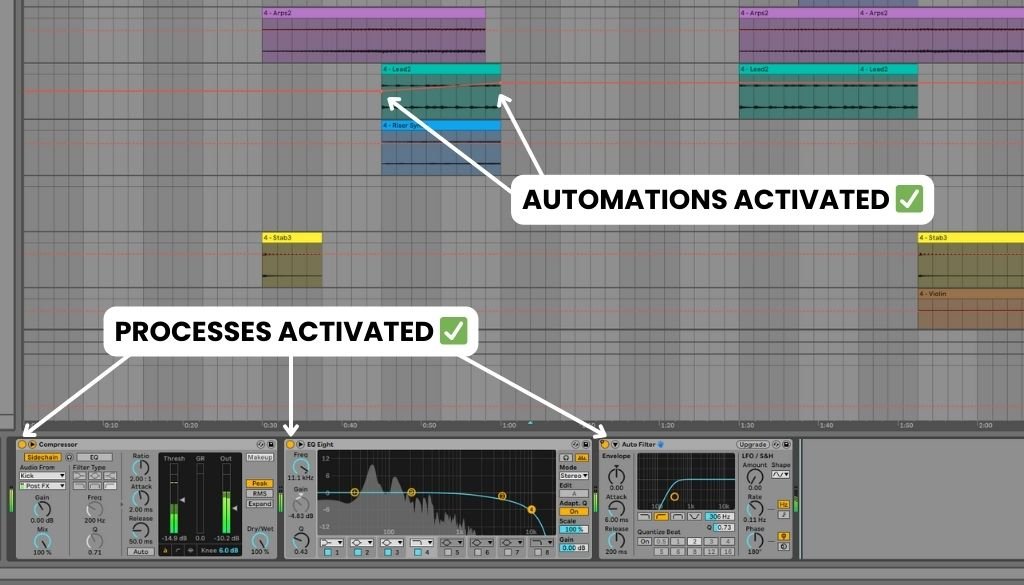
👉 Handle Master Channel Effects Carefully : If your mix includes a filter on the master channel, apply the same filter settings to each affected stem individually. This ensures that no elements lose their intended tonal shaping when separated.
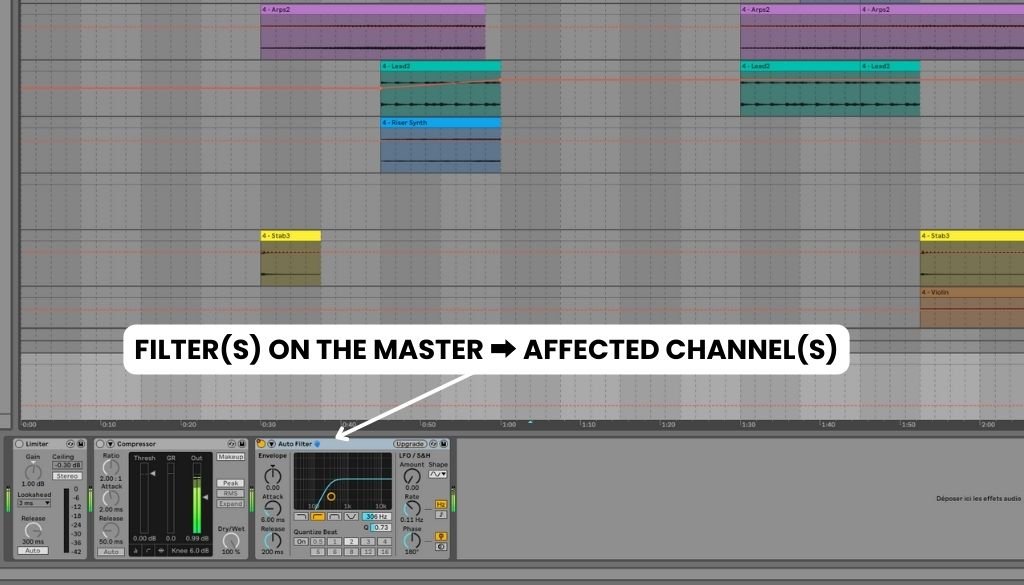
👉 Avoid Limiters and Compressors on the Master Bus : These should be removed before exporting, as they can restrict dynamics and limit flexibility during the mixing and mastering process. The mastering engineer will apply the necessary compression and limiting to achieve the final polished sound.

Use Send and Return Channels for Effects 🔄
When exporting your stems, keep them dry – meaning no reverb, delay, or chorus effects directly on the stems. Instead, use send/return channels.
Why ? Effects like reverb, delay, or chorus can take up a lot of space in the mix. Applying them directly to the stems limits flexibility during the mixing process.
How ? Send us the dry signal (clean) on one stem and the wet signal (effected) on another. For example, if you want a delay on vocals, export a clean vocal stem and a separate stem with the delay effect.
Benefits ? This lets the mixing engineer adjust the amount of effect in the mix without altering the original sound, offering more control over the final result.
⚠️ It is also possible to keep your effects as they are, with delay directly on the stems, and we will work with them during the mixing and mastering process.
Check Your Levels ✅
Before you send your stems, it’s really important to make sure the levels are right. Here’s what you should do :

👉 Leave some headroom : Aim for -3 dB peaks on each stem. This gives us a little room to work with while still preserving the integrity of your sound.
👉 Avoid clipping : If your stems are clipping (going over 0 dB), it can distort the sound and make it harder to work with. Make sure everything stays below 0 dB.
👉 Balance is key : If something’s too loud (like a snare or vocal), it can mess with the mix. Make sure the levels are balanced before exporting.
Include Silence at the Beginning and End (Optional) 🕰️
Adding a bit of silence at the start and end (about 2-5 seconds) will help avoid clicks and pops during playback. It gives us a smooth start and end to work with.
👉 Don’t trim the beginning or end : Always include a little space so we can fade in and out without issues.
Export Separate Stems for Each Element 🎻
When exporting stems, each element in your track should be its own individual stem. Here’s the best way to do it :
👉 One stem per sound : For example, export separate stems for vocals, drums, guitar, bass, etc.
👉 Avoid mixing elements : Don’t combine multiple sounds into one stem (e.g., don’t mix kick, snare, and toms into one “drum” stem unless it’s absolutely necessary). It is crucial to always export your kick, bass, and sub as separate stems.
This will give the mixing engineer all the pieces needed to work efficiently and make the best mix.
⚠️ You can send your kick and bass together in one stem AND send them separately as individual stems.
Export Your Stems in the Best Format 💾
We want to work with the highest quality files possible. Here’s what you need to do :

👉 Change the Rendered Track dropdown to “All Individual Tracks“.
👉 Select the “Include return and master effects” option in the Export Audio/Video dialog. By enabling this, you’ll guarantee that the full effect processing is applied to each exported stem, giving you the full sound as heard in your project.
👉 Don’t normalize your stems. When exporting your stems, don’t normalize them. Normalizing adjusts the overall level, which can mess with the balance of your mix.
👉 44.1 kHz sample rate is the standard for most mixes.
👉 Go with WAV or AIFF files. These formats are lossless and will give us the best sound.
👉 24-bit depth is ideal for great sound quality.
👉 Skip MP3s or other compressed formats — they lose a lot of quality.
👉 Don’t apply dithering. It is something we use during mastering when we’re reducing the bit depth, and it can interfere with the mixing process. We’ll handle all that at the final stage.
Double-Check for Missing Files 🔍
Before you hit “send,” make sure you haven’t forgotten anything. Double-check for missing stems or tracks that are essential for the mix.
Back vocals, percussion, and any special effects are easy to miss, but they’re important for a complete mix.
Check for any samples or sounds that you might have used but haven’t included.
Use a Reliable File Transfer Service 🚀
To make sure everything gets to us safely, use a reliable file transfer service like:
👉 WeTransfer, Google Drive, Dropbox, or OneDrive.
👉 ZIP your files : Compress your stems into one ZIP file to make things easier for you and us.
👉 Avoid email for large files, as it usually can’t handle them.
Provide a Reference Track (Optional) 📀
If you have a reference track that captures the sound or vibe you’re going for, send it to us ! This helps us understand the mix you’re envisioning.
👉 Pick something similar : Choose a track that’s in the same genre or vibe.
👉 Use it for balance and tone : It’ll give us a clearer idea of the sound you want to achieve.
Include Detailed Notes (Optional) 📝
If there are any specific things you want us to focus on in the mix, let us know ! You can include some notes, such as:
👉 Preferred balance : Do you want the vocals to sit upfront or the drums to be punchier ?
👉 Sound or style : Any references to a specific style or sound you’re going for ?
👉 Other requests : For example, certain effects, automation, or panning preferences.
The more information, the better we can match your vision.
Conclusion: Your Stems Are Ready for Mixing 🎉
And that’s it! By following these steps, you’ll make sure your stems are prepared in the best way possible for mixing. Clean, organized, and high-quality stems give us the flexibility to create the perfect mix that brings your track to life. Ready to send those stems ? Let’s make your track sound amazing!